
Connect your Amazon Seller & Advertising accounts to unlock:
Real-time Profit Tracking
TACoS & ACoS Analytics
WhatsApp & Email Insights
Product-Level Performance Analytics
Setup Time: ~3 Minutes
Free Trial: 30 Days
Module 1 - Create Your sellerview.AI Account
Step 1 - Open sellerview.AI
Visit sellerview.AI and click Login / Signup in the top-right corner.
What happens next?
You’ll be taken to the account creation page where you can start your free trial.

Step 2 - Enter Your Details
Fill in:
Email ID
Phone Number
Then click Verification Email
Tips
Use your active business email
Verification email is sent instantly
Step 3 - Verify Your Email
Open your inbox and find the email from sellerview.AI
Click:
Verify My Email & Continue

If you don’t see the email
Check Spam/Promotions folder
Wait 1–2 minutes
Refresh inbox
Step 4 - Create Your Account
Now enter:
Your Name or Brand Name
Password
Confirm Password
Click Sign Up.
Best Practice
Use your Amazon brand name to keep your analytics organized.
Security Note
Your password is encrypted and securely stored.
Module 2 - Connect Your Amazon Seller Account
To unlock analytics, sellerview.AI needs secure read-only access to your Amazon Seller account.
Step 5 - Connect Amazon SP API
After signup, your dashboard features will remain locked until your Amazon account is connected.
Click:
Connect SP API
Security Assurance
Read-only access
sellerview.AI cannot modify listings or inventory
Access can be revoked anytime from Amazon
Step 6 - Enter Seller Details
Now enter:
Seller Name / Brand Name
Marketplace (Example: Amazon.in)
Then click Continue.
Important
Select the correct marketplace for accurate reporting.
Step 7 - Login to Amazon & Grant Permissions
Amazon will now ask for authorization.
Review permissions and click:
Confirm
Permissions Include
Pricing Data
Inventory Data
Product Listings
Brand Analytics
Order Information

Step 8 - SP API Connection Complete
Your Amazon Seller account is now connected successfully.
You’ll now see your connected seller account under:
Amazon SP API Credentials
Module 3 - Connect Amazon Advertising
This step connects your Amazon Ads account to complete your analytics setup.
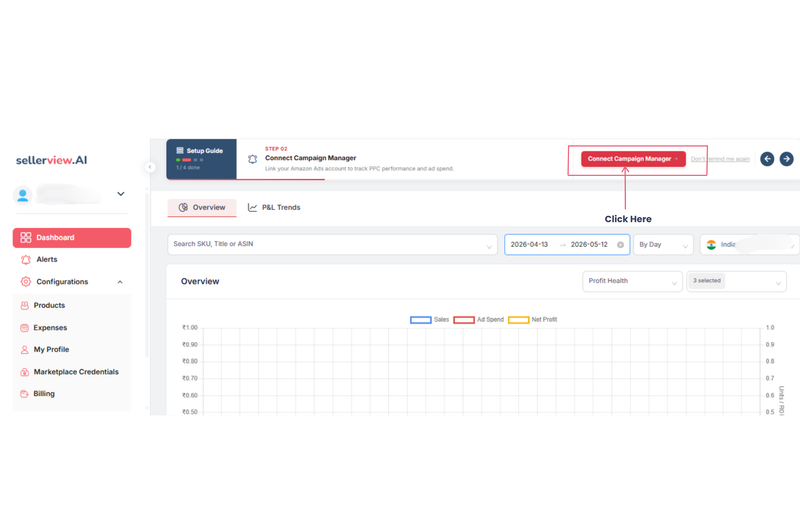
Step 9 - Connect Advertising Account
Click:
Connect Campaign Manager
Why this matters
Without Advertising access:
TACoS cannot be calculated
Ad spend won’t appear in reports
Profit numbers may be incomplete

Step 10- Enter Advertising Account Details
Now:
Enter Seller Name
Select Marketplace
Click Continue
Important
This is a separate connection from SP API.
Both connections are required for complete analytics.
Step 11 - Allow Amazon Advertising Permissions
Amazon will ask for Advertising access permissions.
Click:
Allow
Step 12 - Select Advertising Profile
Choose the correct advertising profile and click:
Save Selected Profile

Tips
Select the profile linked to your active campaigns
Multiple brands can be connected later
Module 4 - Go Live
Your setup is now complete.
Step 13 - Accounts Successfully Connected
Both connections are now active:
Amazon SP API
Amazon Advertising
Your analytics dashboard is now unlocked.
Features Now Enabled
P&L Dashboard
TACoS Tracking
ACoS Tracking
Real-Time Profit Analytics
Product-Level Insights
WhatsApp Alerts
Email Reports
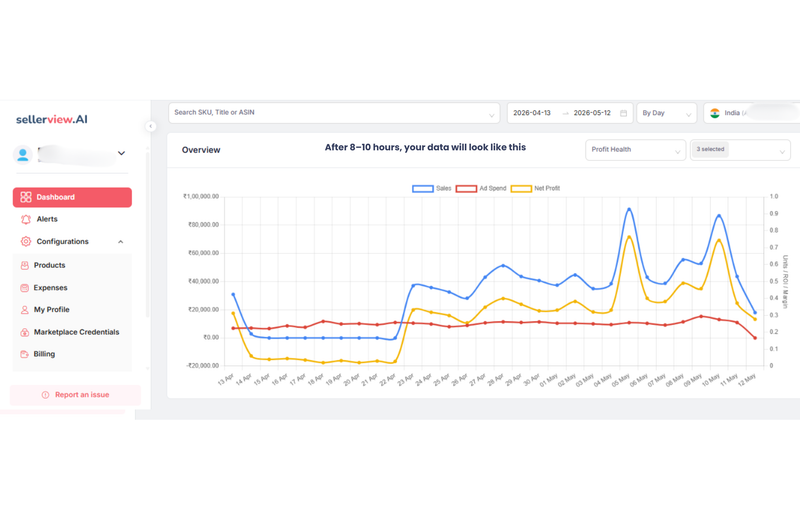
Step 14 - Data Sync in Progress
sellerview.AI is now securely syncing your Amazon data.
Sync Time
Small accounts: 8–10 hours
Large accounts: Up to 48 hours

Need Help?
If you face any issue during setup, you can contact the sellerview.AI support team or book a free on boarding call with a P&L expert.